 |
4-4: Scaling and Panning |
|
|
4-4: Scaling and Panning |
|
The scale of a window's contents can be controlled in a number of ways. The Zoom In command of the Windows menu zooms in, magnifying the contents of the display. The Zoom Out command does the opposite - it shrinks the display. Both zoom by a factor of two.
The most useful scale change command is Fill Window of the Windows menu, which makes the current cell fill the window.
To examine a specific area of the display, use the Focus on Highlighted subcommand of the Special Zoom command, which makes the highlighted objects fill the display. To examine a specific area of the display that is not necessarily aligned with nodes and arcs, use the rectangle zoom button, which allows you to drag-out a rectangle, and then zooms to that area. You can zoom to a specific area in a single step by using the Highlight then Focus subcommand, which lets you drag an area and then zooms to that area.
The Make Grid Just Visible subcommand of the Special Zoom command zooms (in or out) until the grid is minimally visible. Any futher zoom-out from this point will make the grid invisible. If the grid is not being displayed, it is turned on.
A final scaling command is Match Other Window which redraws the current window at the same scale as the other. If there are more than two windows, you will be asked to select the window to match.
Besides scaling, you can also pan the window contents, shifting it about on the display. This is typically done with the sliders on the right and bottom of the window. On Windows systems that have a mouse wheel, you can use that to pan vertically (and hold the shift key while rolling the mouse wheel to pan horizontally).
In addition to these methods, panning can also be done from menu commands. The Left, Right, Up, and Down commands of the Windows menu all shift the window contents appropriately (and because they are bound to quick keys, these operations can even be done from the keyboard). By default, these commands shift the screen by about 30% of its size. You can use the subcommands of the Panning Distance command to change that amount. The Small subcommand causes subsequent shifts to be about 15% of the screen size. The Medium subcommand causes subsequent shifts to be about 30% of the screen size. The Large subcommand causes subsequent shifts to be about 60% of the screen size.
Another way to pan the window is to drag the cursor to the window edge. When the edge is hit, the window automatically pans by 10% of its size.
The Center subcommands of the Windows menu are rarely-used panning commands for shifting the window contents without scaling. There are two subcommands: Selection makes the window shift so that the highlighted objects are in the center of the window, and Cursor makes the window shift so that the current cursor location is in the center of the window. Note that this second subcommand is useful only when bound to a keystroke, because you cannot issue the command and have a valid cursor location at the same time.
| Once a particular scale and position is established in a window, you can save it and retrieve it later. The Saved Views... command of the Windows menu presents a dialog that lists saved views. You can name the current view and save it with the "Save This View" button. A previously saved view can be displayed with the "Restore View" button. | 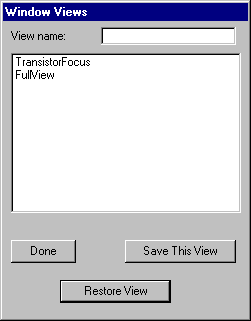 |
 |
Previous |  |
Table of Contents | Next |  |