
1-11-4: Schematics Tutorial: Make an Arc
Chapter 1: Introduction
|
1-11: Schematics Tutorial 1-11-4: Schematics Tutorial: Make an Arc |
|
| To wire a component, select it, move the cursor away from the component, and use the right button. If you click the right button and hold it without releasing, then you can move around and see where the wire will go when you do release. | 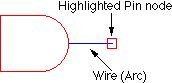 |
A wire will be created that runs from the component to the location of the cursor. Note that the wire is a fixed-angle wire which means that it will be drawn along a horizontal, vertical, or 45-degree path from the originating node. To see where the wire will end, click but do not release the button and drag the outline of the wire's terminating node (a pin) until it is in the proper location. It is highly recommended that you do all wiring operations this way, because wiring is quite complex and can follow many different paths.
Once a wire has been created, the other end is highlighted (see above). This is the highlighting of a pin node that was created to hold the other end of the arc. Because it is a node, the right button can be used again to continue the wire to a new location. If, while wiring, the dragged location is over an existing component, the wire will attach to that component.
To remove wires or nodes, you can issue the Undo command (in menu Edit) to remove the last created object. Alternatively, you can select the component and use the Selected command (in menu Edit / Erase).
 |
Previous |  |
Table of Contents | Next |  |