 |
3-7: Cell Information |
|
|
3-7: Cell Information |
|
The most basic cell information that you can get is a list of cells. This can be done with the Edit Cell... command of the Cells menu. The dialog will show the cell names (at which point you can cancel the dialog).
To get some basic information about the current cell (size, dates, etc) use the Describe this Cell command of the Cells menu.
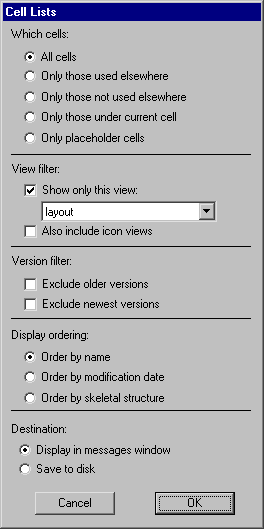 |
To get such information for a subset of cells, use the General Cell Lists... command.
The dialog selects a subset of the cells in the current library. The section labeled "Which cells:" selects the cells to be listed (all, only those used in other cells, only those NOT used in the current cell, only those in the current cell, or only "placeholder" cells: those created because of cross-library dependency failures). The section labeled "View filter:" allows only certain views to be displayed. The section labeled "Version filter:" allows removal of older or newer versions of cells. The section labeled "Display ordering:" controls the order in which the selected cells will be listed. The section labeled "Destination:" allows you to dump this listing to a disk file, formatted for spreadsheets (tab-separated). |
The last six columns show the usage and five state bits. The usage is the number of times that this cell appears as an instance in other cells. The state bits are: "L" (if the cell contents are locked), "I" (if instances of the cell are locked), "C" (if the cell is part of a cell library), "D" (if the cell has passed design-rule checking), and "N" (if the cell has passed network consistency checking).
To see all exports in the current cell, use the Export menu commands List Exports (for a text listing) or Show Exports (for a graphical indication). To see a list of exports that are electrically connected to the current object, at multiple levels of hierarchy, use the List Exports on Network and List Exports below Network commands from the Info menu.
For more cell information, use the subcommands of the Special Cell Lists submenu of the Cells menu. The List Nodes in this Cell subcommand shows all nonprimitive nodes in the current cell. The List Cell Instances subcommand shows all cell instances below the current cell. The List Cell Usage... subcommand looks up the hierarchy and finds cells that contain the a particular cell as an instance (you will be prompted for the particular cell).
| The Graphically, Entire Library subcommand displays a graph of every cell in the library. The Graphically, From Current Cell subcommand displays a graph that places the current cell at the top. These commands create a graph of the cell hierarchy. This graph is actually a new cell, called "CellStructure", built from Artwork nodes, and stored with the other cells. If you select a name in this graph, then the Edit Cell... command of the Cells menu defaults to that cell. | 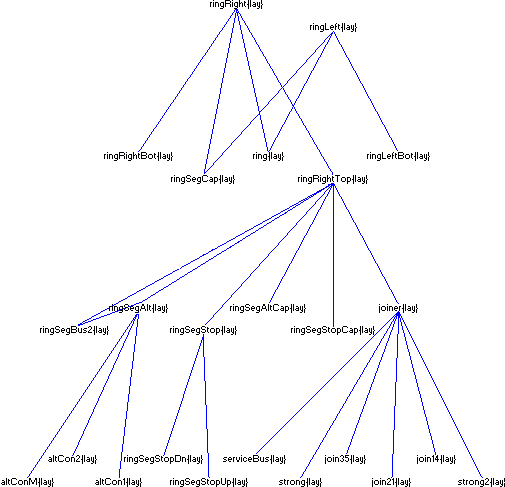 |
The Edit Documentation View command of the View menu allows you to store arbitrary text with the cell. The text editing window that appears can contain any information. See Section 4-10 for more on text editing.
The List Layer Coverage command of the Info menu computes the percentage of the cell that is covered by each layer. This is useful information for certain fabrication processes which insist on a minimum amount of each layer in the die.
To examine and set more information about existing cells, use the Cell Options... command of the Cells menu:
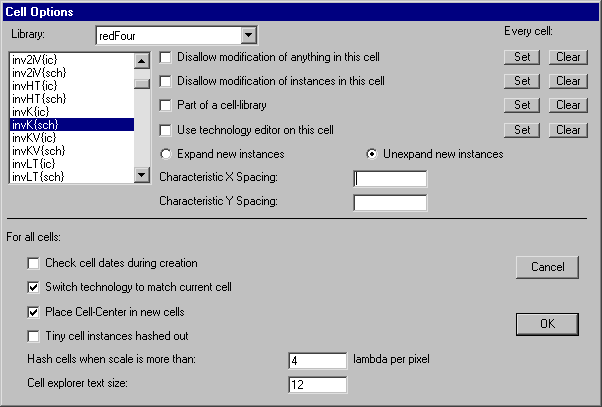
The upper part of the dialog provides options on a per-cell basis (choose the library and the cell and then set its options). The checkbox "Disallow modification of anything in this cell", allows you to control whether the contents of a cell is editable or not. When modification is disallowed, no changes may be made. This is useful when you want to allow examination without accidental modification. The checkbox "Disallow modification of instances in this cell", also prevents changes to the selected cell, but in this case, only sub-instances are locked. This is useful when you have a correct instance placement and are doing wiring. Buttons on the right allow you to set or clear these flags for all cells.
| If you make a change that has been disallowed, a dialog appears that asks if you want to override the lock. You may make the change, disallow the change, or remove the lock (which effectively unchecks the locks in the Cell Options... dialog). | 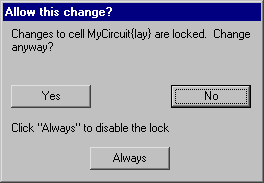 |
The check box "Part of a cell-library" indicates that this cell is from a library of standard cells and should be treated accordingly. Buttons on the right allow you to set or clear this flag for all cells. Most dialogs that list cells can remove those from cell-libraries to keep the list simpler.
The check box "Use technology editor on this cell" indicates that this cell part of a technology editor library. Editing of cells in a technology editor library is done in a special mode (indicated with a yellow border in the window). See Section 8-2 for more information about technology editing.
The "Expand new instances" and "Unexpand new instances" buttons choose whether newly created instances of this cell are expanded (contents visible) or unexpanded (drawn with a black outline) See Section 3-4 for more on expansion.
The "Characteristic Spacing" is the spacing of this cell when arrayed (see Section 6-4).
The lower part of the dialog contains options that will apply to all cells. The check box "Check Cell dates during creation" requests that date information be used to ensure a proper circuit building sequence. When this box is checked, warning messages will be issued when editing a cell that has more recent subcell instances. Electric tracks cell creation and revision dates, and this information can be displayed with the Describe this Cell command and others in the Cells menu.
The check box "Switch technology to match current cell" requests that the current technology automatically change whenever the current cell changes so that the two match.
The check box "Place Cell-Center in new cells" requests that all newly created cells have a Cell-Center node (named "Facet-Center" for historical reasons) placed at the origin (see Section 3-3 for more on Cell centers).
The check box "Tiny cells hashed out" requests that cells be displayed with a gray hash pattern when they are too tiny for their contents to be distinguished. Without this option, all geometry is drawn, which can take a long time. You can control the threshold of "tinyness" by setting the number of lambda units per pixel. Any view in which this many lambda units are shown in pixel will be too small to display fully.
The explorer window has 3 sections: the Hierarchical View, Contents View, and Errors View.
 |
The Hierarchical View of the cell explorer lists only the "top level" cells of each library
(top level cells are those that are not used as instances in any other cells).
By clicking on the box with the "+", the cell's contents are shown in a recursively indented manner.
Each cell lists the number of times that it occurs in the higher-level cell.
The Contents View of the cell explorer lists every cell in every library. Inside of each cell is a list of arcs, exports, networks, and nodes. When editing technology-edit libraries, the Contents View breaks down the library according to layers, nodes, and arcs. The third part of the Cell Explorer is the Errors View. This lists all errors that were generated by other tools (DRC, ERC, NCC, etc.) and which are normally presented with the "<" and ">" keys. |
Any text shown in the Cell Explorer can be copied (and pasted to another document) by selecting a line and using the Copy command. In both the Contents and Hierarchical View, you can double-click on any object to see it in the other half of the window. Double-clicking on a cell shows that cell. Clicking a cell and typing the DELETE key deletes that cell. Double-clicking on a library name makes that library the current one.
In addition, the Cell Explorer uses a "context menu" that is accessed by right-clicking on an entry (use command-click on the Macintosh). The context menu offers special operations, for example the ability to recursively open or close all entries below the current one.
The line which separates the Cell Explorer from the edit window can be moved simply by clicking on it and dragging it (see Section 4-3 for more on window control). To make the Cell Explorer go away, delete that window partition, click on the tree icon again, or issue the Cell Explorer... command again.
The font size of text in the Cell Explorer can be set in the "Cell explorer text size" field of the Cell Options... dialog.
 |
Previous |  |
Table of Contents | Next |  |