 |
11-4: The Java Interface |
|
|
|
11-4: The Java Interface |
|
This section assumes that the reader is very familiar with the use of Electric, and somewhat familiar with the internals of the system. The Internals Manual (a document that is available from Static Free Software) provides a broad, C-oriented view of the information described here. For users of Java, however, this section summarizes the relevant aspects of the Internals Manual. In general, the best way to understand this section is to try each command as it is explained.
Throughout this section, examples of Java code will appear underlined. For example, the "getArcProto" function takes the name of an arc prototype and returns a pointer to that object. This is coded as Electric.getArcProto("Metal-1") which evaluates to the pointer of the form ArcInst(21726672).
To invoke the Java interpreter, use the JAVA... subcommand of the Language Interpreter command of the Tools menu. On some systems it may be necessary to move the cursor into the messages window (the text window) in order for the interpreter to "hear" you.
If you have installed the Bean Shell (see the installation instructions) then the Java interpreter will be able to handle any Java expression. The Bean Shell also allows you to use "E" instead of "Electric" in any expression.
If you do not have the Bean Shell installed, then the interpreter can accept only one type of command: CLASS.METHOD which invokes a method in a class. The method must be static and take no parameters.
Electric has its own private area for Java classes,
which it adds to the list of places that Java will search. This path is the
"java" subdirectory of Electric's library directory. It is best to place your
Java code there, and to add this import line at the
start:
import
COM.staticfreesoft.*;
To get back to Electric from Java, type ^D (hold the Control key and type a "D"). On Windows, you must type the ESC key instead.
An important use of Java is in attributes and parameters. For example, the "width" attribute of a schematic transistor can be set to be code. Such code takes the form of an expression such as 2+2 or Math.Sqrt(7.5).
Commonly, the expression needs to make use of a
parameter value (see Section 6-8 for more on creating
cell parameters). To get an parameter value from an instance above this in the
hierarchy, use:
Electric.getParentVal("name", default, height)
where "name" is the attribute
name, default is the default value to return if the
attribute is not found, and height is the number of
levels of hierarchy to climb when looking for the attribute (0 for infinite). As
a shortcut for finding parameter values, the Bean Shell adds five macros which
use this routine:
The entire Electric database is a collection of objects, each of which has an arbitrary number of attributes. This section briefly outlines the object types and shows how they are related. Further detail can be found in the Internals Manual. See Section 11-5 for a list of attributes on these objects.
Individual components inside of circuits are described with NodeInst objects (instances of nodes), and individual wires are described with ArcInst objects (instances of arcs). Connections between components and wires are described with PortArcInst objects (instances of ports that connect to arcs). Because both components and wires have geometry, each one also has an associated Geom object, and all of the Geom objects in a cell are organized spatially into an R-tree with a collection of RTNode objects.
Class objects also exist to describe all individuals of a given type. The NodeProto object describes the prototypical component, which may have many individual NodeInst objects associated with it. For example, the CMOS P-Transistor is described with a single NodeProto object, and many NodeInst objects for each instance of such a transistor in any circuit. Hierarchy is implemented by having complex components, better known as cells, represented in the same way as the primitive components such as transistors. For example, the ALU circuit is described with a single NodeProto object, and each instance of that circuit higher up the hierarchy is described with a NodeInst object.
The Cell object aggregates different views and versions of a circuit. Each of these is called a "cell" (represented with a NodeProto object) and a cell has both a View pointer and a version number.
In addition to component prototypes, the ArcProto describes classes of wires and the PortProto describes classes of component-wire connections. An additional object, the PortExpInst, exists for exports. The Network object describes electrically connected ArcInst and PortProto objects within a cell.
As a further aggregation of objects, the Library is a collection of cells and cells. The Technology is a collection of primitive components (NodeProtos) and all wire classes (ArcProtos).
In addition to the above object pointers, there are some standard types of values that can be accessed through getval:
| Integer | 32-bit integer |
| String | null-terminated string of bytes |
| Float | 32-bit floating point number |
| WindowPart | window partition object |
| WindowFrame | display window object |
| Constraint | constraint system object |
| Graphics | graphical attributes object |
| Polygon | graphical shape object |
| XArray | transformation object |
Also, there is the ability to have displayable variables (those whose values appear on the object) with the keyword: vdisplay.
Any Java object that represents an Electric object is actually an object with a single field in it: the address of that object in Electric. You can get that field with getAddress and you can set that field (a dangerous operation) with setAddress. You can test to see if that field points to a null pointer with the isNull method. Finally, you can see whether two fields are equal with isEqual (remember that the Java objects may be different, but if their Electric addresses are the same, then these are the same Electric object).
To begin a search through the database, it is important
to know the current library. This is done with:
Electric.curLib()
which returns
a pointer to a Library object (for example Library 15464800). From here, the current cell can be
obtained with:
Electric.getVal(Electric.curLib(), "firstnodeproto")
Essentially, any attribute can be examined with getVal, and new attributes can be created with setVal. getVal has the
following format:
Electric.getVal(object, attribute)
where object is the object
being accessed and attribute is the attribute being
requested. A list of all existing attributes on the Electric objects is given at
the end of this document.
New attributes can be created on any object with setVal. In general, many of the existing attributes
that are described at the end of this document cannot be set with setVal, but rather are controlled with special database
modification methods. The format for setVal is:
Electric.setVal(object,
attribute, value, options)
Where the options are either 0 or vdisplay to show this attribute when displaying the
object. For example, to add a new attribute called "power-consumption" to the
transistor component "t1", and give it the value 75, use:
Electric.setVal(t1,
"power-consumption", 75, 0);
To add a displayed name
to node "t1", use:
Electric.setVal(t1, "NODE_name", "Q1",
Electric.vdisplay);
You can set arrays of values as
well. For example, to set the shape of pure-layer node "metal" to be a diamond,
use:
Integer[]
outline = new Integer[8];
outline[0] = -1000; outline[1] = 0;
outline[2] = 0;
outline[3] = 1000;
outline[4] = 1000; outline[5] = 0;
outline[6] = 0;
outline[7] = -1000;
Electric.setVal(metal, "trace", outline, 0);
Single entries in array attributes can be set, with:
Electric.setInd(object,
attribute, index, value)
where index is the 0-based entry in the array.
Finally, attributes can be deleted with:
Electric.delVal(object,
attribute)
However, only those attributes that have
been created with setVal can be deleted in this way.
The other attributes are protected.
To create a new cell in the current library, use:
Electric.newNodeProto(cellName, Electric.curLib())
which returns a NodeProto
pointer that can be used in subsequent calls which place components and wires in
that cell.
To get the address of an existing NodeProto, use:
Electric.getNodeProto(cellName)
which returns the same type of value as newNodeProto. Thus, the code:
Electric.NodeProto mycell = Electric.newNodeProto("adder{lay}",
Electric.curLib());
is the same as the code:
Electric.newNodeProto("adder{lay}",
Electric.curLib());
Electric.NodeProto mycell =
Electric.getNodeProto("adder{lay}");
and both deal
with the "layout" view of the cell called "adder".
To create a component in a cell, use:
Electric.newNodeInst(proto, lowX, highX, lowY, highY,
transpose, angle, cell)
where proto is a NodeProto
of the component that is to be created, lowX, highX, lowY, and highY are the bounds of the component, angle is the number of tenth-degrees of rotation for
the component, transpose is nonzero to transpose the
component's orientation (after rotation), and cell
is the NodeProto in which to place the
component.
The four bounds values are somewhat confusing to
compute. For primitive components (such as Transistors), any value is acceptable
and the component will scale. However, it is still nice to know the default
value, which can be obtained from the NodeProto
with getVal as follows:
Electric.NodeProto tran =
Electric.getNodeProto("P-Transistor");
int lowx =
((Integer)Electric.getVal(tran, "lowx")).intValue();
int highx =
((Integer)Electric.getVal(tran, "highx")).intValue();
int lowy =
((Integer)Electric.getVal(tran, "lowy")).intValue();
int highy =
((Integer)Electric.getVal(tran, "highy")).intValue();
When complex components (cells) are placed, the bounds
MUST be exactly the same as the bounding box of the cell's contents. This
information is available in the above manner. As an example of newNodeInst, and given the above bounds calculations, a
default size P-Transistor is created in cell "adder" with:
Electric.NodeInst t1 = Electric.newNodeInst(tran, lowx, highx,
lowy, highy, 0, 0, mycell);
The returned pointer to
the transistor component will be used later when wiring.
To wire two components, it is necessary to know these four things:
The final piece of information necessary is the type of
arc and the width of the arc. Given an arc name, the type can be obtained with:
Electric.getArcProto(arcName)
Given an ArcProto, its default
width can be obtained with:
Electric.getVal(arc, "nominalwidth")
When all of the information is ready, the call:
Electric.newArcInst(arcType, width, bits, nodeA, portA, xA,
yA, nodeB, portB, xB, yB, cell)
places the wire.
You can ignore the value of bits and set it to zero.
The size used to create a node or arc is not necessarily the size of the object.
This is because the size given to newNodeInst is the outer bounds of the object which may include implant layers.
To get the difference between the "nominal size" and the newNodeInst size, use:
Electric.nodeProtoSizeOffset(primitiveNodeProto)
which returns an array of 4 Integers with the low X, high X, low Y and high Y offsets.
The routine:
Electric.arcProtoWidthOffset(arcProto)
returns the difference between the "nominal width" and the actual width used in newArcInst.
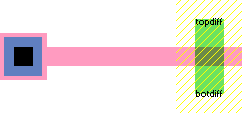
Here is a complete example of placing a transistor, a contact, and running a wire between them (the result is shown at the bottom).
/* create a cell
called "tran-contact" in the current library */
Electric.NodeProto mycell =
Electric.newNodeProto("tran-contact", Electric.curLib());
/* get pointers to primitives */
Electric.NodeProto tran =
Electric.getNodeProto("P-Transistor");
Electric.NodeProto contact =
Electric.getNodeProto("Metal-1-Polysilicon-1-Con");
/* get default sizes of these primitives */
int tlowx =
((Integer)Electric.getVal(tran, "lowx")).intValue();
int thighx =
((Integer)Electric.getVal(tran, "highx")).intValue();
int tlowy =
((Integer)Electric.getVal(tran, "lowy")).intValue();
int thighy =
((Integer)Electric.getVal(tran, "highy")).intValue();
int clowx =
((Integer)Electric.getVal(contact, "lowx")).intValue();
int chighx =
((Integer)Electric.getVal(contact, "highx")).intValue();
int clowy =
((Integer)Electric.getVal(contact, "lowy")).intValue();
int chighy =
((Integer)Electric.getVal(contact, "highy")).intValue();
/* get pointer to Polysilicon arc and its default width
*/
Electric.ArcProto arctype =
Electric.getArcProto("Polysilicon-1");
int width =
((Integer)Electric.getVal(arctype, "nominalwidth")).intValue();
/* create the transistor and the contact to its left
*/
Electric.NodeInst c1 = Electric.newNodeInst(contact, clowx,
chighx, clowy, chighy,
0, 0, mycell);
Electric.NodeInst t1 =
Electric.newNodeInst(tran, tlowx+8000, thighx+8000,
tlowy, thighy, 0,
0, mycell);
/* get the transistor's left port coordinates */
Electric.PortProto tport = Electric.getPortProto(tran,
"p-trans-poly-left");
Integer[] tpos = Electric.portPosition(t1, tport);
/* get the contacts's only port coordinates */
Electric.PortProto cport = (Electric.PortProto)Electric.getVal(contact,
"firstportproto");
Integer[] cpos = Electric.portPosition(c1, cport);
/* run a wire between the primitives */
Electric.newArcInst(arctype, width, 0,
t1, tport,
tpos[0].intValue(), tpos[1].intValue(),
c1, cport,
cpos[0].intValue(), cpos[1].intValue(), mycell);

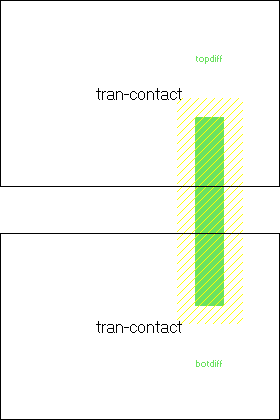
Cells, as created by newNodeProto, can be placed in other cells with newNodeInst. The instances simply use complex NodeProto fields rather than primitive NodeProtos as in the above example. For example, the following code creates a new cell called "two-trans" and places two instances of the above "tran-contact" cell, one above the other.
|
/* create a
cell called "two-trans" */ |
 |
Another necessary feature, when making hierarchy, is the
ability to place wires between connection sites on cell instances. To do this,
it is necessary to create exports. This takes a port on a primitive component
(for example, the transistor or contact in the "tran-contact" cell) and makes
it into an export on the current cell. This is done with:
Electric.newPortProto(cell, nodeInCell, portOnNode,
portName)
where cell is
the cell containing the component whose port is being exported, nodeInCell is that component, and portOnNode is the particular port on that node being
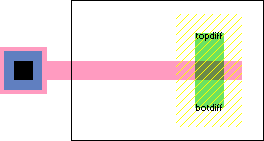
exported. For example, to export the top and bottom diffusion ports in the
"tran-contact" cell (as shown here), the following code can be added:
Electric.newPortProto(mycell, t1, Electric.getPortProto(tran, "p-trans-diff-top"), "topdiff"); Electric.newPortProto(mycell, t1, Electric.getPortProto(tran, "p-trans-diff-bottom"), "botdiff"); |
 |
And then, the components "o1" and "o2" in the cell "two-trans" can be wired, using the ports called "topdiff" and "botdiff":
|
/* get pointer
to P-Active arc and its default width */ |
 |
Another set of routines exists for hierarchy traversal. When generating a netlist from a circuit, the hierarchy is typically traversed down to the bottom. Cell parameters are evaluated based on the traversal path to the particular cell with the parameter. To inform the system of the traversal path, it is necessary to call special routines during traversal.
At the start of traversal, call
Electric.beginTraverseHierarchy()
Before descending into a cell instance, call
Electric.downHierarchy(node, index)
where node is the cell instance node, and index is the index of which node (if it is arrayed).
After returning from the examination of the cell instance, call
Electric.upHierarchy()
Finally, after completing hierarchy traversal, call
Electric.endTraverseHierarchy()
To find out your location in the hierarchy (if this object is being viewed inside another) use:
Electric.getTraversalPath()
which returns an array of NodeInsts, terminated by a null one.
Each entry is the instance, higher up the hierarchy, that contains the former level.
Two types of modification can be done to existing
objects: deletion and change. To delete a cell, use:
Electric.killNodeProto(cell)
To make a copy of a cell (within the same library or
from one library to another), use:
Electric.copyNodeProto(fromCell, toLibrary,
toCellName)
where fromCell is the original cell (NodeProto) and toLibrary is
the destination library. Use curLib to copy to the
same library. The new cell name is the last parameter. The method returns the
address of the new cell (NodeProto).
To delete a component, use:
Electric.killNodeInst(node)
Before a component can be deleted, all wires and exports
must be removed.
To change the size or orientation of a component, use:
Electric.modifyNodeInst(node, dLowX, dLowY, dHighX, dHighY,
dRotation, dTrans)
where dLowX, dLowY, dHighX, and dHighY are the
changes to position and size. dRotation and dTrans are changes to the orientation.
To change the prototype of a component, use:
Electric.replaceNodeInst(oldNode, newPrototype)
where the old component is oldNode, and the new NodeProto that should be in its place is newPrototype. This new prototype must be able to
connect to all existing arcs. The method returns the address of the new
component.
To delete a wire, use:
Electric.killArcInst(arc)
To change the width or position of a wire, use:
Electric.modifyArcInst(arc, dWidth, dX1, dY1, dX2,
dY2)
where dWidth, dX1, dY1, dX2, and dY2 are the
changes to the width, X/Y position of end 1, and X/Y position of end 2. Note
that position changes cannot cause the connecting nodes to move, so the changes
may only be small ones that work within the ports.
To change the prototype of a wire, use:
Electric.replaceArcInst(oldArc, newPrototype)
where oldArc is the former wire
and newPrototype is the new ArcProto to use. The nodes on either end must be able
to accept this new type of wire. The method returns the address of the new wire.
To delete an export, use:
Electric.killPortProto(cell, port)
which will remove port port on
cell cell.
To move an export from one component to another (keeping
connected wires), use:
Electric.movePortProto(cell, oldPort, newNode,
portOnNewNode)
where the old port is oldPort in cell cell, and
it is now moved to component newNode (which is also
in cell cell), port portOnNewNode of that component.
A common operation is a search of all components in a cell. The following code prints the name of all components in the cell "mycell":
Electric.NodeInst node;
for(node = (Electric.NodeInst)Electric.getVal(mycell,
"firstnodeinst");
!node.isNull();
node =
(Electric.NodeInst)Electric.getVal(node,
"nextnodeinst"))
{
System.out.println("Found " + describeNode(node) + "
node");
}
Where describeNode is defined as follows (the name of a node is found in different places depending on whether it is a primitive or complex NodeProto):
public static String
describeNode(Electric.NodeInst node)
{
Electric.NodeProto proto = (Electric.NodeProto)Electric.getVal(node, "proto");
if
(((Integer)Electric.getVal(proto, "primindex")).intValue() != 0)
return((String)Electric.getVal(proto, "primname"));
return((String)Electric.getVal((Electric.Cell)Electric.getVal(proto, "cell"),
"cellname"));
}
And the following code prints the name of all wires in the cell "mycell":
Electric.ArcInst arc;
for(arc = (Electric.ArcInst)Electric.getVal(mycell,
"firstarcinst");
!arc.isNull();
arc =
(Electric.ArcInst)Electric.getVal(arc,
"nextarcinst"))
{
String arcname = (String)Electric.getVal((Electric.ArcProto)Electric.getVal(arc, "proto"),
"protoname")
System.out.println("Found " + arcname + " arc");
}
To do a search of all nodes and arcs in a rectangular
area of a cell, first call:
Electric.initSearch(lowX, highX, lowY, highY, cell)
where lowX, highX, lowY, and highY are the coordinates to search in cell cell (a NodeProto). This
method will return an integer search key that can then be passed repeatedly to:
Electric.nextObject(searchKey)
which will return Geom
objects of each node and arc in the search area. When this method returns a null
Geom, the search is complete. Geom objects can point to either nodes or arcs,
depending on their "entryisnode" attribute. Then, the "entryaddr" attribute will
point to the actual NodeInst or ArcInst. If you wish to terminate the search early,
call:
Electric.termSearch(searchKey)
Here is an example of code that prints the names of all
nodes and arcs in the area (2000 <= X <= 10000, -3000 < = Y < =
3000). The selected area is shown as a black box here.
int key =
Electric.initSearch(2000, 10000, -3000, 3000, mycell);
for(;;)
{
Electric.Geom object = Electric.nextObject(key);
if
(object.isNull()) break;
int isnode= ((Integer)Electric.getVal(object,
"entryisnode")).intValue();
if (isnode != 0)
{
Electric.NodeInst ni = (Electric.NodeInst)Electric.getVal(object, "entryaddr");
System.out.println("Found node " +
describenode(ni));
} else
{
Electric.ArcInst ai =
(Electric.ArcInst)Electric.getVal(object,
"entryaddr");
String arcname = (String)Electric.getVal((Electric.ArcProto)Electric.getVal(ai, "proto"),
"protoname");
System.out.println("Found arc " + arcname);
}
}
Nodes and arcs are built out of layers, and layers are
described with objects of type Polygon: To get all
of the layers in a node, first call:
Electric.nodePolys(node)
to get
the number of polygons on the node, and then make repeated calls to:
Electric.shapeNodePoly(node, index)
to get the polygons.
If you wish to get the electrical layers (a larger set that breaks layers where they cross an electrical boundary), use nodeEPolys and shapeENodePoly. To get all of the layers in an arc, first call arcPolys to get the number of polygons on the arc, and then make repeated calls to shapeArcPoly to get the polygons.
Because polygon objects are created dynamically, they
must be freed when you are done with them. Call:
Electric.freePolygon(poly)
to
deallocate a Polygon.
To get information about a particular layer in a
technology, call
Electric.layerName(tech, layer)
to get its name or
Electric.layerFunction(tech, layer)
to get its behavior (as described in the module
"efunction.h").
The following example finds all polygons on a node and prints their layer names:
for(node =
(Electric.NodeInst)Electric.getVal(myCell,
"firstnodeinst");
!node.isNull();
node =
(Electric.NodeInst)Electric.getVal(node,
"nextnodeinst"))
{
int polys = Electric.nodePolys(node);
for(int i =
0; i < polys; i++)
{
Electric.Polygon poly =
Electric.shapeNodePoly(node, i);
Electric.Technology tech =
(Electric.Technology)Electric.getVal(poly,
"tech");
int layer = ((Integer)Electric.getVal(poly,
"layer")).intValue();
int count = ((Integer)Electric.getVal(poly,
"count")).intValue();
String layerName = Electric.layerName(tech, layer);
System.out.println("Polygon on layer " + layerName + " has
" + count + " points");
Electric.freePolygon(poly);
}
}
There are three routines available to get design rules
for layers.
Electric.maxDRCSurround(tech, library, layer)
returns the maximum distance around the layer (in the
specified technology and library) that any design rule can be. The routine:
Electric.DRCMinDistance(tech, library, layer1,
layer2)
returns the minimum distance between the
layers (in the specified technology and library). The routine:
Electric.DRCMinWidth(tech, library, layer)
returns the minimum feature size of the layer (in the
specified technology and library).
Because nodes may be rotated, it is necessary to apply
the node's transformation to all polygons before using the coordinate values. To
create the transformation that accounts for a node's rotation, use:
Electric.makeRot(node)
which
returns an XArray object. To create the
transformation that accounts for the node's position within its parent, use:
Electric.makeTrans(node)
To apply a transformation to a polygon, use:
Electric.xformPoly(poly, trans)
A view is an object that describes a cell. There are
many standard views: Layout, Schematic, Icon, Simulation-snapshot, Skeleton,
VHDL, Verilog, Document, Unknown, and many flavors of Netlist. In addition, new
views can be created with "newView":
Electric.newView(viewName, abbreviation)
and views can be deleted with killView (the standard views cannot be deleted):
Electric.killView(view)
To get
a view object, use getView on its name.
To associate different views of a cell, the methods iconView and contentsView
obtain different cells. For example:
Electric.iconView(mycell)
finds the associated icon cell of the cell in which
"mycell" resides.
In the above examples, the current library was always
used. This is determined by calling:
Electric.curLib()
However,
there can be other libraries. To get a specific named library, use:
Electric.getLibrary(libName)
To create a new library, use:
Electric.newLibrary(libraryName, libraryFile)
where libraryName is the name
to use, and libraryFile is the path name where this
library will be saved. This method returns the address of a new library object
that can then be used when creating cells.
Only one library is the current one, and to switch, you
must use:
Electric.selectLibrary(lib)
A library can be deleted with:
Electric.killLibrary(lib)
A library can be erased (its cells deleted, but not the
library) with:
Electric.eraseLibrary(lib)
A technology is an environment of design that includes
primitive components and wire prototypes. The current technology can be obtained
with:
Electric.curTech()
A specific technology can be obtained from its name
with:
Electric.getTechnology(techName)
All technologies can be found by traversing a linked list, the head of which is a technology named "Generic".
A tool is a piece of synthesis or analysis code that can
operate upon the database. A particular tool object can be obtained with:
Electric.getAid(toolName)
where
the possible names of tools are:
| "compaction" | circuit compaction |
| "compensation" | geometry compensation |
| "drc" | design-rule checking |
| "erc" | electrical-rule checking |
| "io" | input/output control |
| "logeffort" | logical effort analysis |
| "network" | network maintenance |
| "pla" | programmable logic array generator |
| "project" | project management |
| "routing" | automatic wire routing |
| "silicon-compiler" | netlist-to-layout silicon assembler |
| "simulation" | simulation |
| "user" | the user interface |
| "vhdl-compiler" | VHDL-to-netlist compiler |
A tool can be switched on with:
Electric.toolTurnOn(tool)
where tool is a tool object.
A tool can be turned off with:
Electric.toolTurnOff(tool)
A tool can be given a specific instruction with:
Electric.tellTool(tool,
count, parameters)
where the parameters is an array of count strings. For example, to list all technologies,
use this code:
Electric.Tool user = Electric.getTool("user");
String[] message = new
String[2];
message[0] = "show";
message[1] =
"technologies";
Electric.tellTool(user, 2, message);
The command "show technologies" and other commands are from
the low-level command interpreter, which is documented fully in the Internals
Manual.
To force display changes to be drawn on the screen, you
must use:
Electric.flushChanges()
Every change to the database is queued internally in a
"batch" which includes the change and any constrained side-effects of that
change. A new batch is created for each Java session with the interpreter (also
for each Electric command that is issued from the keyboard/mouse). To reverse
the last batch of changes, use:
Electric.undoABatch()
Multiple calls to this method in a single batch will
undo multiple batches. To erase the list of change batches, use:
Electric.noUndoAllowed()
If you are creating a wire that makes many bends, it is
necessary to create special nodes called "pins" at each bend. To find out what
kind of pin to use for a given wire type, use:
Electric.getPinProto(arc)
where
arc is the wire type, and the method returns the
component type (NodeProto) of the pin.
Network objects can be obtained by name with the method
getNetwork which takes a name and a cell in which
to search. For example, the code:
Electric.getNetwork("insig", mycell)
obtains the address of the network called "insig" in cell
mycell.
The generic function of a node instance can be determined with:
Electric.nodeFunction(node)
which returns a value from the list of constants in the C header file "efunction.h".
This value is essentially the same one as would be obtained by looking at the "userbits" field of the node's prototype.
However, certain components that have generic prototypes will be made more specific by this method.
 |
Previous |  |
Table of Contents | Next |  |